
Share calendars for easier scheduling
Learn how to share your calendar and schedule meetings in Outlook 2010
Introduction (00:03)
Welcome to Business Productivity, I’m Ulrika Hedlund. Organizing and scheduling meetings can be a real nightmare. You have to find a date and time that suits everyone, you have to find an available conference room and you also need to prepare an agenda for the meeting. It really helps if you and your colleagues share your calendars with each other. That way you can find a suitable time for the meeting without having to go back and forth and ask people when they’re available.
In this video I’ll show you how you can share your calendar with others and how you can set up group calendars to get a quick overview of available resources and your team’s schedule. I’ll also share some useful tips of how I make sure people reserve time in their calendar in advance for upcoming meetings. Let me show you!
Share your calendar with your colleagues (00:55)
The calendar in Outlook becomes even more powerful if you use it with a back-end exchange server to share calendar information with your colleagues. To share your calendar, click “Share Calendar”.

And then select who you want to share it with. You can request permission to view the recipient’s calendar and then you can select how much information you want to show; “Availability only”, “Limited details” or “Full details”.

I always recommend that you choose full details. Remember: none of your private details will be shown. And then I’ll send this.
Another way to share your calendar, without sending emails to selected employees, is to click “Calendar Permissions” and then set the default to reviewer. To do that, just change the permission level from custom to reviewer.

Now all employees within your organization will be able to see the full details of your calendar. I’ll click “Apply” and then “OK”. I normally recommend that everyone in the organization shares their calendar this way. It maximizes transparency and it also eliminates some of the emails sent.
Share your availability with people outside of your organization (02:05)
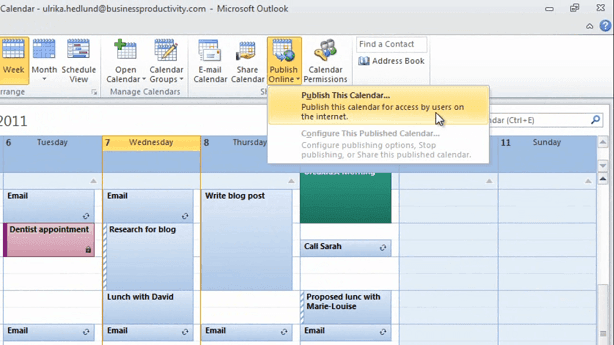
If you frequently schedule meetings with people outside of your organization it will help to share your calendar using an internet service online. To do that, click “Publish Online” and then select “Publish This Calendar”.
Here you can select how much information you want to show, just like we did before, and you can select what date range you want to share. Since I only use this for scheduling I don’t need others to see historical data. So I’ll just change this to 1 day before today and then 3 months after today.
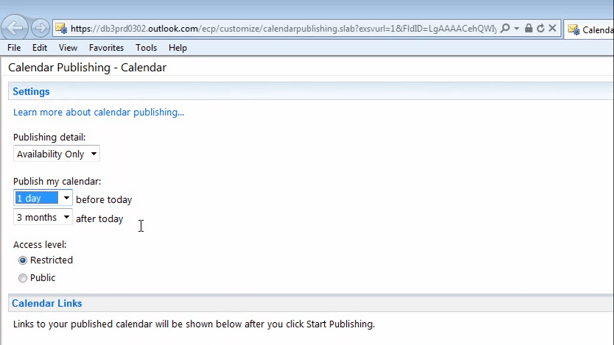
The access level defines who can see it. If I choose restricted, only people that has the link that I will share with them can see my calendar. And then I’ll click “Start Publishing”. Here is the link to the calendar:

This is the one I now need to share with my business partners in order to more easily schedule meetings with me.
Use shared calendars to organize a meeting (02:58)
To open up a calendar that someone has shared with you click “Open Calendar” and then you can select “From Address Book”.

In this case I’ll choose Jacob and Vandana because I want to schedule a meeting with them. Now click “OK”. Now their calendars open up side-by-side with my calendar.
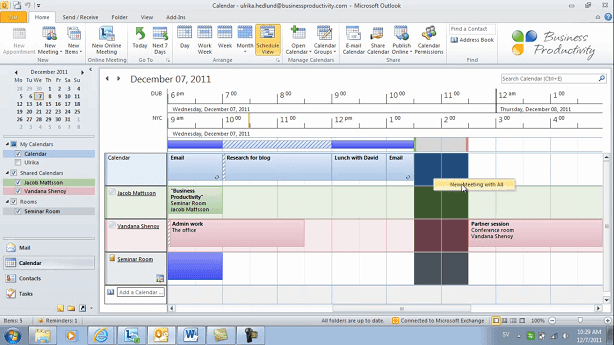
To schedule a meeting for today I’ll select only to see today, to easier find an available slot for a meeting. I can also go to the “Schedule View”

This opens up our calendars in a horizontal view and I get a summary bar at the top, which indicates when we’re all free. It seems like 1:30 to 2:30 would be a good time, but I want to check to see if the seminar room is open. So I’ll add one more calendar, which is the seminar room, and then click “OK”. It’s updating the information, luckily the seminar room is available.
To schedule a meeting I’ll just right-click and select “New Meeting with All”.
A new meeting request opens up with all the recipients on the “To…”-line and the seminar room for the location. I’ll type the subject for the meeting; “Storyboard brainstorming for next month’s videos”. And I’ll insert an agenda, but since I always insert agendas in my meeting requests I’m going to insert a table that I’ve saved as a quick table that I’ve called “Agenda”.
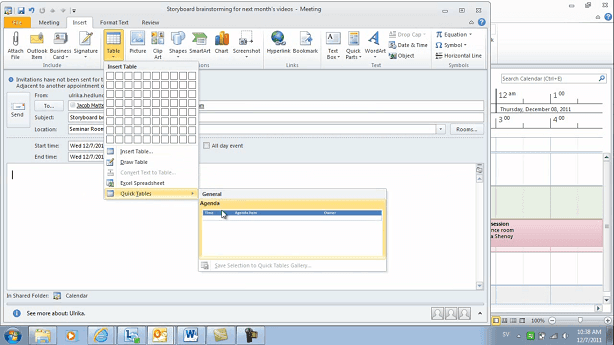
A meeting request should always include a detailed agenda with the allocated time and owner for each item.
Invite optional attendees to your meeting (04:22)
In a meeting request you can put your attendees as required or as optional. I want to invite Rebecka as an optional attendee. So I’ll type in “Rebecka” click “Check Names” and then I’ll click on this icon and choose “Optional Attendee” instead.

This is a great option if you want to invite someone that’s not required in the meeting, but you want to let them know that they are invited. And then I’ll click “Send”.
Create a calendar showing multiple people’s schedule (04:48)
I’ll uncheck the other shared calendars to go back to my normal weekly view. As you can see, calendars that I’ve once opened up are now available in my navigation pane, so that I can easily access them again.
I can easily add an additional calendar to a calendar group. To do that just right-click, “Add Calendar”.

Here I’ll select the conference room, for our “Rooms” group. And it’s added to the group. I can also create a new calendar group by clicking “Calendar Groups” and “Create New Calendar Group”.

I’ll give a name for this group; “Marketing Team” and then I can add the people I want to have in this group. And there you go! Now, I can easily schedule meetings with various teams and have access to their calendars right away.
Track who is coming to the meeting (05:35)
To keep track of who’s responded to a meeting request, just open up the meeting request and click “Tracking” under the meeting tab.

Here you can see who’s accepted the meeting and who’s declined.
Send out placeholders for meetings in the future (05:48)
Since people’s calendars fill up really quickly I always think it’s a good recommendation to send out placeholders for appointments that are happening in the future. To send a placeholder for a marketing team off site I’ll mark the marketing team group calendar and click “New Meeting with All”. In this subject field I’ll type; “[Placeholder] – Meeting off site” and just “TBD”, to be decided, for the location. I’ll change the date and the time for this meeting and then I’ll set the time as “Tentative”.

In the body of the meeting request I’ll just write; “Agenda to follow when the meeting has been confirmed”. And then click “Send”.
Now if I go to March 28th you can see that they have placeholders, so I can make sure that they reserve this date ahead of time for a marketing offsite.
Closing (06:35)
Many customers I meet are reluctant to share their calendar information with others. They want to keep their daily schedule to themselves. I believe that you should have an open door policy when it comes to sharing your calendar with others; it really makes it so much easier to schedule meetings.
I’m Ulrika Hedlund, for Business Productivity – thanks for watching!