
Enrich your writing
Introduction (00:04)
If you are a business professional and you want to have a successful career, you have to possess the ability to express yourself in writing. Whether you’re writing a sales proposal, a marketing brochure or a blog article – it needs to be written well.
There are a number of built in tools in Word 2013 that can help you enrich your writing. In this video you’ll learn how to use the synonym tool to enhance your language, you’ll learn how to look up the definition of words and how to use the translation tool to translate your text to another language.
Understanding Grammar and Spelling checks (00:40)
Here I have a blog article that I’m writing in Word 2013. The title is “Amazing new ways to interact with computers”. Since this is a title, each word ought to be capitalized, so I’ll mark the entire title by clicking in the margin next to the title. On the “HOME” tab, in the font section I’ll click “Change Case” and select to “Capitalize Each Word”. I get a blue squiggly line under the word “to”. A blue squiggly line means that the word is formatted incorrectly or that there is an issue with the grammar.

In general in a title you should capitalize all words except prepositions and conjunctions and since “to” is a proposition, Word shows me that it should not be capitalized. To correct it, I’ll just right-click and select the correct case. In previous versions of Word, grammar mistakes were marked with green lines, now all formatting and grammatical mistakes are marked with blue.
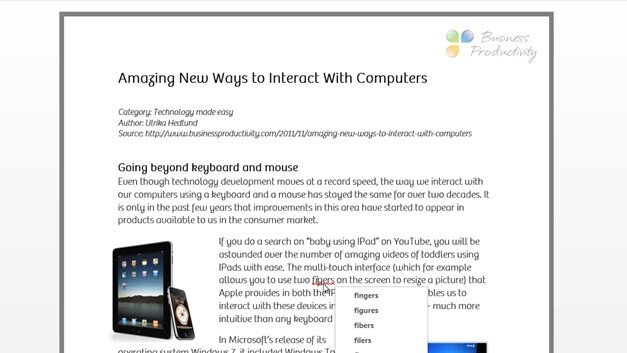
In this first sentence I have another grammatical mistake that Word has picked up. What I meant to write was “the way we interact” so I’ll just add “way” and the blue line disappears. The red line, which indicates spelling mistakes, shows that I have misspelled “fingers” so I’ll just right-click and select the correct spelling.
Checking your language settings (02:04)
For the spell checker to work, make sure you have the right language configured. To check your language settings, go to the “REVIEW” tab, click “Language” and then “Set Proofing Language”. Make sure you have the correct language selected. If you work with multiple languages you can add those languages to the Language Preference settings. Click “Language”, “Language Preferences” and then select your preferred language in the drop down and click “Add”. I already have the two languages I use so I’ll just close down this window.

Looking up the definition of words (02:41)
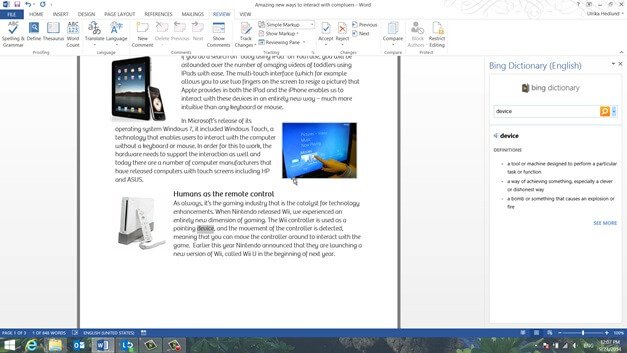
In this paragraph there is another blue line in the sentence starting with, “The Wii controller is used as a pointing devise”. The word is not miss-spelled, but I’m using a word with the wrong meaning. Instead Word suggests I should use device, with a “c”. If you are unsure of a word, you can look up the definition. To look up the definition of a word, right-click and select “Define”.
You need to have a dictionary installed and be online for this to work. If you haven’t already installed a dictionary you’ll be promoted to select and install one. I’ve already installed the Bing Dictionary so it opens up next to the document. Here I can see that the definition of the word “device” is in fact the one I wanted. If I look up the word spelled with an “s” I can see that it means “to invent a method”.
The definition look up works really well when in read-mode. Just right-click the word, select “Define” and a definition window pops up. If you are unsure of how a word is pronounced you can just click the little audio icon. This is a great help if you are reading a long report and you want to look up a word you are unsure of.

Automatically replacing words in your text (04:01)
In this paragraph I’ve written “IPad” numerous times. But I’ve written it with a capital “I” and I’d like to change it to a lower case “i”. Instead of changing this manually I’ll let Word do this for me by using the “Replace Tool”. To replace a word in your document, mark the word you want to replace and go to the “Editing” section at the far end of the “HOME” tab and click “Replace”. Here I’ll choose to replace IPad with a capital “I” to iPad with a lower case “i”. In order for Word to capture this I need to click “More” and then “Match Case”, then I click “Replace All”.

Word goes through the rest of the document and makes three replacement. To go through the document from the beginning I just click “Yes” and then “OK”. As you can see the changes have now been applied to the entire document.

Enriching your vocabulary using the Synonym Tool (05:01)
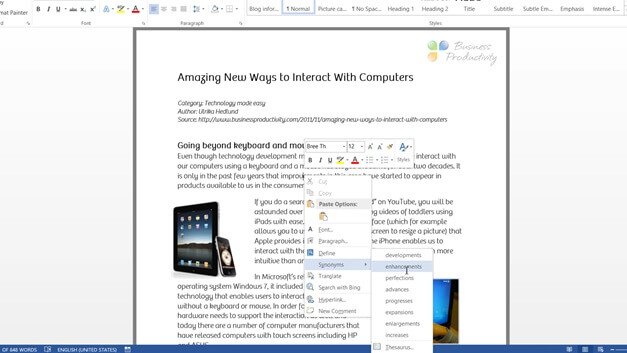
I don’t know about you but I tend to use a rather limited vocabulary when I write. A great way to enrich your writing is to use the “Synonym” tool. To find a synonym for a word, place your marker on the word, right-click, and select “Synonyms”. You will get a number of different options that you can use in your text. Here I’ll replace the word “improvements” with “enhancements”.
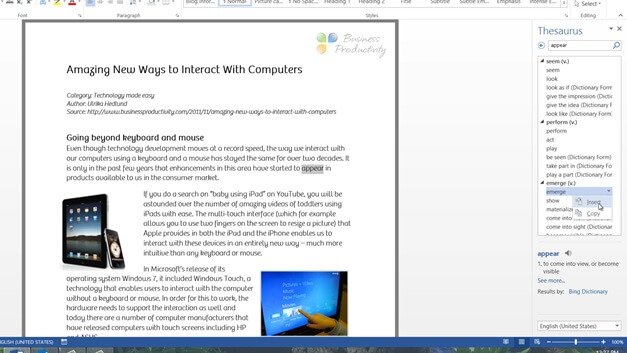
If you’d like to see even more options than the synonyms provided in the menu you can choose to open up the “Thesaurus”. To do that click on a word, in this case I’ll choose “appear” right-click, select “Synonyms” and then click “Thesaurus”. Here you have more options to replace the word. Here you can also see “Antonyms”, these are opposites of the word. I’ll choose to replace “appear” with “emerge“, so I’ll click the drop-down menu and click “Insert”.
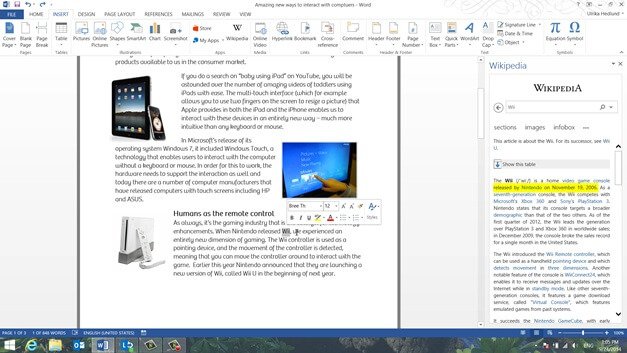
Using the Wikipedia App for in-document research (06:01)
In this section I write about Nintendo’s Wii. I’d like to add to my text what year Nintendo released Wii and I’ll be sure to find this information on Wikipedia. Instead of opening up a web browser and then going to Wikipedia, I can search directly from my document using the Wikipedia Office App. To use the Wikipedia app you first need to make sure that it’s available. If you’ve added it you will see it under the “INSERT” tab in the “Apps” section.

If you don’t see the Wikipedia app there, click the “Store” button. Search for “Wikipedia” in the Office Store and then click “Add”. Once it’s been added, click “Wikipedia” to open up the Wikipedia side bar. Double-click the word you want to look up. I’ll double-click “Wii” and can see here from Wikipedia that Wii was released in November 2006. So I can easily just add this to my text. The beauty here is that you don’t have to leave Word to find the information you’re looking for – it’s all there directly at your fingertips.
Translating text between different languages (07:09)
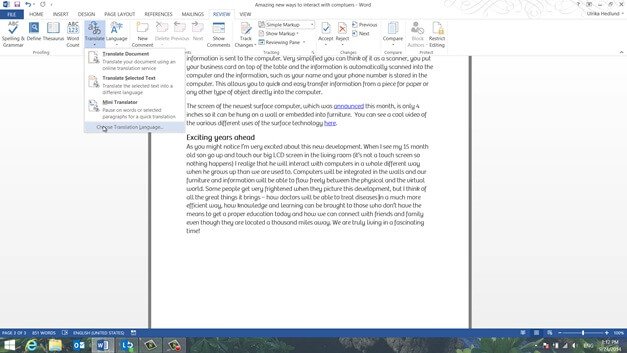
The final tool I want to show you is the Translation Service. Sometimes when I’m writing a text I find it difficult to find the right word in English since English isn’t my first language. To use the Translation service, mark the word you want to translate. Here I have a word in Swedish that I’d like to translate into English. Right-click the word and choose “Translate”. The research bar opens up where you can enter the language you want to translate from and the language you want to translate to. I want to translate this from “Swedish” to “English.” Here I get the translation of the word which is “diseases.”

To insert the word into your document just click “Insert”. If you want to translate the entire document select the language you want to translate from, and the language you want to translate to, and click “Translate the whole document”. The text will be sent to the online translation service. As you can see the document is now being translated and for those of you who understand Swedish you can now see that it has been translated. I can easily select another language, here at the web interface. Here I’ll translate the document to Arabic. After a few moments, the Translation service has translated the document.
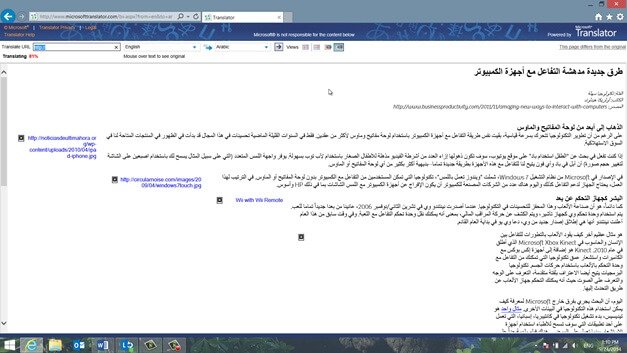
This is a very useful service if you want to get an understanding of what a text is all about. However, I would not recommend that you use this for professional translations.
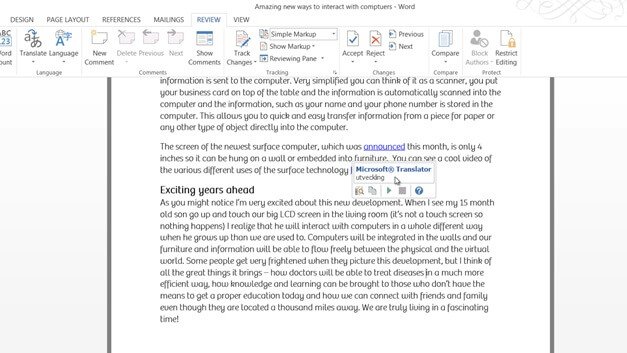
Using the mini-translator (08:45)
If you frequently want to see the translation of words in your document you can open up the “mini translator”. To use the mini-translator click the “REVIEW” tab and then “Translate”. First you need to make sure that you have the desired language entered in the settings. To check your settings click “Choose translation language”.
Select which language you want to translate to in the language drop down. Click “OK” then click “Translate” again and turn on the Mini-translator by clicking it. Now, if you place your mouse cursor over a word and pause, the Mini-translator will open up showing you the translation of the word. You can also listen to how it should be pronounced.
Closing (09:30)
It’s really convenient to have the tools you need to enrich your writing accessible without having to leave Word. Not only do you save time, you also minimize distractions and the temptations to start doing something else when you should be writing.